
How to Build a Brick Kiln Model: A Step-by-Step Guide to an Authentic Industrial Diorama
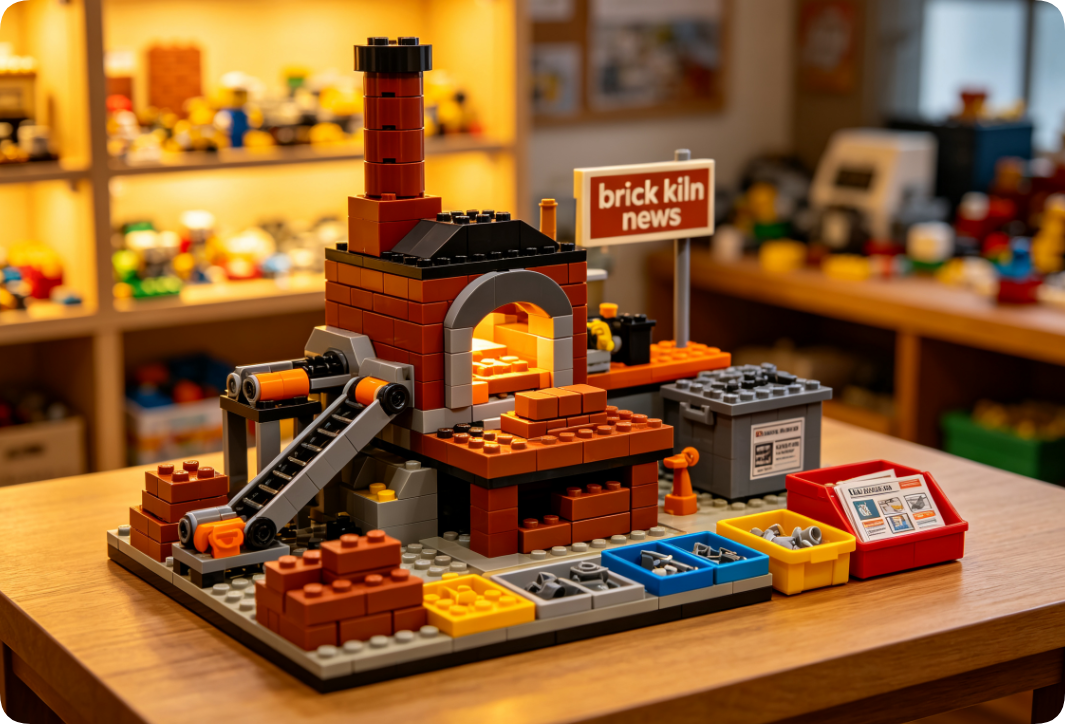
Old brick kilns have a quiet drama to them — soot-stained walls, a tall smoking chimney, glowing arches, and the honest look of hard work baked into every surface. Recreating one in building bricks is one of the most rewarding challenges a builder can take on. It rewards planning, patience, and a good eye for detail, and the finished piece looks stunning on any shelf.
This guide walks you through brick kiln model building from first sketch to final weathering. You'll plan the structure, pick the right bricks and colors, replicate the signature details that make a kiln look real — chimney, arch, fire chamber, and grime — and then display or expand it into a full industrial scene. Whether you build to unwind after work, want a striking display piece, or love designing your own models from scratch, a kiln delivers on every front.
Here's the build plan:
- How to plan the kiln structure before you place a brick
- Choosing bricks and a color palette that reads as real
- Building the four signature kiln features
- Adding weathering that sells the age
- Displaying and expanding your diorama
Let's fire it up.
Why a Brick Kiln Makes a Great Build
A kiln sits in a sweet spot for builders. It's architectural enough to challenge you, but structured enough to plan cleanly. There are no fiddly curves demanding a thousand tiny plates — just solid masonry, a bold chimney, and rich texture. That balance makes it ideal for intermediate builders leveling up, and satisfying for veterans who want a focused weekend project.
It's also a build with real character. Most dioramas lean cozy or futuristic. A kiln goes the other way — industrial, weathered, honest. That contrast makes it stand out on a shelf full of castles and spaceships.
And it scales beautifully. Start with a single kiln, then grow it into a working yard with drying racks, brick stacks, carts, and workers. The structure you build today becomes the anchor of a much bigger scene later.
In short: A kiln balances challenge with clean planning, brings rare industrial character, and grows into a full diorama over time.
Step 1: Plan the Structure First
Great brick kiln model building starts on paper, not on the baseplate. Ten minutes of planning saves hours of teardown.
Pick Your Kiln Type
Kilns come in a few classic shapes, and each sets the tone for your build:
- Beehive kiln — a round, domed structure with a single arched door. Compact and dramatic.
- Scotch kiln — a rectangular box kiln with multiple arched fire holes along the base. Great for detail.
- Bottle kiln — a tall, bottle-shaped chimney over a working chamber. The most iconic silhouette.
For a first build, the Scotch kiln is the friendliest. Its straight walls and repeating arches build cleanly on a grid, and the shape forgives small mistakes.
Set Your Scale
Decide your scale before anything else. Minifigure scale is the most versatile — it lets you add workers, carts, and tools later, and part availability is excellent. A minifigure-scale kiln typically fits on a 32x32 stud base with room for a small yard.
Sketch the Footprint
Draw the base outline first, then mark the four zones every kiln needs: the fire chamber (base), the stacking chamber (middle), the chimney (top), and the arched openings (front). Reserving space for each now prevents a cramped, unbalanced model later.
Plan for Height
Kilns are tall. Budget vertical bricks generously — a convincing chimney often stands twice the height of the chamber below it. Sketch the elevation from the side so your proportions feel right before you start stacking.
In short: Choose a kiln type, lock your scale, sketch the footprint with all four zones, and plan for real height.
Step 2: Choose the Right Bricks and Colors
Color and texture do the heavy lifting here. A kiln lives or dies on how "fired" and worn it looks, and that comes down to smart part selection.
Build Your Base Palette
Real kilns aren't one flat color. They're a blend of fired-clay tones. Mix these shades across your walls for instant realism:
- Reddish brown — your dominant masonry color
- Dark orange — sun-baked and freshly fired sections
- Medium nougat / tan — worn and faded patches
- Dark red — deeper, older brickwork
Scatter these shades irregularly rather than in neat blocks. Real masonry is uneven, and that randomness is exactly what makes a model read as authentic instead of toy-like.
Add Texture With the Right Elements
Flat walls kill realism. Break them up with:
- Masonry / profile bricks for a cobbled, mortar-line look
- Grille and slotted tiles for vents and air intakes
- Cheese slopes and 1x1 slopes for chipped edges and rubble
- Round plates and tiles for scorch marks and worn stone
A collection rich in these small detail parts is worth building up over time. If you're short on textured elements, the BrickHobby shop carries versatile sets loaded with the slopes, grilles, and masonry bricks these scenes need.
Reserve Your Fire Colors
Set aside a small pile of trans-orange, trans-yellow, and trans-red pieces. These become the glowing embers inside your fire chamber — a small touch that makes the whole model come alive.
In short: Blend four fired-clay tones unevenly, add masonry and slope textures, and reserve translucent pieces for the fire glow.
Step 3: Build the Fire Chamber
Work bottom to top, starting with the fire chamber — the heart of the kiln.
Lay the Foundation
Build a solid base plate structure two to three bricks high. This grounds the model and gives your arches something sturdy to sit on. Use your darkest brick tones here, since the base takes the most soot and wear in real life.
Create the Fire Openings
The fire chamber needs one or more arched openings where fuel goes in and heat comes out. Leave gaps in your base wall for these — we'll arch them in the next step. Behind each opening, build a small recessed pocket.
Add the Ember Glow
Inside those recessed pockets, place your trans-orange and trans-red pieces. Layer a few trans-yellow bits at the center for a hot core. If you want to take it further, tuck a small warm LED behind the translucent pieces for a genuine glow — this turns a good model into a showstopper.
In short: Build a solid dark base, leave gaps for fire openings, and pack the recesses with translucent pieces for an ember glow.
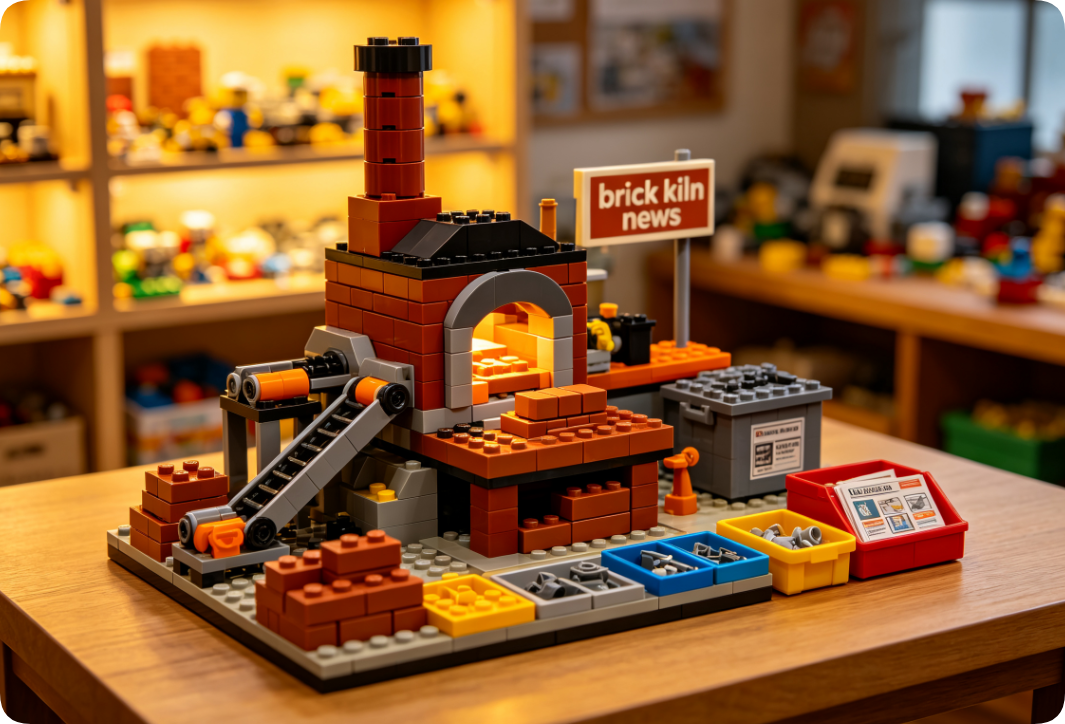
Step 4: Master the Arch
The arch is the signature feature of any kiln, and the part most builders fear. It's easier than it looks with the right technique.
The SNOT Arch Method
SNOT — "Studs Not On Top" — lets you angle bricks sideways to form a curve. For a small arch, use a few 1x2 bricks with side studs to bend the top of the opening inward. Two angled slopes meeting at the center create a clean pointed arch.
The Curved-Slope Shortcut
For a rounded arch, curved slope pieces (often called arch bricks) drop straight in. Bridge the top of an opening with a single arch element, or stack two for a taller doorway. This is the fastest route for beginners.
Frame the Opening
Once the arch holds, outline it with a contrasting brick tone — a darker red or brown frame makes the arch pop and mimics the reinforced brickwork around real kiln doors. This small framing step dramatically sharpens the look.
Mini-scenario: You build a Scotch kiln with three arched fire holes along the front. You frame each in dark red, tuck glowing embers behind them, and suddenly the wall stops looking like a box and starts looking like a working furnace.
In short: Use SNOT or curved-slope arches, keep them simple, and frame each opening in a contrasting tone to make it read as real masonry.
Step 5: Raise the Chimney
The chimney gives your kiln its unmistakable silhouette. Height and taper are everything.
Build a Stable Core
A tall chimney needs a strong center. Build a solid brick core, overlapping every layer like real masonry so no seam runs straight up. This staggered bond keeps the tower rigid and looks authentic.
Taper the Top
Real chimneys narrow as they rise. Step your walls inward every several layers using plates and jumper plates to shift the grid. Even a subtle taper adds huge realism and stops the chimney looking like a plain pipe.
Cap It Off
Finish the top with a slightly wider lip — a ring of plates or tiles overhanging the rim. Add a few dark, scorched tiles inside the opening to suggest years of smoke. A wisp of "smoke" built from light-gray transparent or cheese-slope pieces is an optional flourish that looks fantastic.
In short: Build a staggered core for strength, taper the walls as they rise, and cap the top with a scorched, overhanging rim.
Step 6: Add Weathering and Grime
This is where an average model becomes a great one. Weathering tells the story of a kiln that's been fired a thousand times.
Layer Soot Around the Fire Openings
Real kilns are blackest near the flames. Cluster dark-gray and black pieces — small plates, tiles, cheese slopes — around every fire opening and up the lower chimney. Fade the darkness outward so it looks like drifting soot, not a painted line.
Break Up the Surface
Add chipped and missing "bricks" by leaving small recesses, or by placing a single off-color plate where a brick has crumbled. A perfectly smooth wall looks new; a kiln should look used. Deliberate imperfection sells the age.
Suggest Wear With Color
Sprinkle faded tan and light-gray pieces on the sun-facing side to imply bleaching, and keep the shaded side darker and richer. This subtle light-and-shadow trick gives your flat walls real depth.
Add Ground Detail
Around the base, scatter loose "rubble" — 1x1 round plates, cheese slopes, and small tiles in brick tones. A patch of ash-gray near the fire openings and a few tumbled bricks make the kiln feel rooted in a working yard.
In short: Cluster soot near the flames, chip the surface with off-color pieces, imply sun-bleaching with color, and scatter rubble at the base.
Step 7: Display and Expand Your Diorama
Your kiln is built. Now make it a scene worth showing off.
Stage the Kiln
Mount the finished model on a slightly larger base with a defined "front" — the side with the arches and glowing embers. Keep the front open and detailed; this is the angle every viewer sees first. A simple ground texture of mixed tan and gray tiles grounds the whole piece.
Add the Working Yard
A kiln never worked alone. Expand outward with:
- Brick stacks — neat piles of 1x2 bricks drying in rows
- A hand cart or wheelbarrow loaded with bricks
- Drying racks built from thin plates and bars
- Workers — minifigures shaping, stacking, and hauling
Each addition tells more of the story and turns a single structure into a living industrial scene.
Grow It Into a Series
Because your kiln sits on a standard base, it can anchor a larger modular display. Build a clay pit on one side, a finished-brick warehouse on the other, and link them with a cart path. This modular approach lets you expand one evening at a time, and it connects easily with other themed sections down the road. For more themed build breakdowns and inspiration, the BrickHobby blog is a good next stop.
Share Your Build
The building community loves an original industrial diorama. Photograph your kiln from its best angle — front-lit, embers glowing — and share it online. You'll gather feedback, spark ideas, and inspire other builders chasing the same theme. Documenting your process also gives you a record of how far your skills have come.
In short: Stage the kiln with a clear front, add a working yard, grow it into a modular series, and share it with the community.
Putting It All Together
Picture the full workflow. You choose a Scotch kiln at minifigure scale and sketch a 32x32 footprint with four zones marked. You blend four fired-clay tones, build a dark, solid fire chamber, and pack the recesses with glowing translucent pieces.
You frame three curved-slope arches in dark red, raise a tapered, staggered chimney, and cap it with a scorched rim. Then you weather it — soot near the flames, chipped bricks in the walls, sun-bleaching on one side, rubble at the base. Finally you stage it with brick stacks, a loaded cart, and two workers mid-haul.
A few focused evenings later, you've got an industrial centerpiece with real story and real presence. Next month you add a clay pit beside it. Your scene grows, one section at a time.
That's the payoff of brick kiln model building — a challenging, characterful build that keeps giving long after the last brick clicks into place.
Conclusion
A brick kiln rewards everything that makes this hobby great: planning, problem-solving, an eye for color, and the patience to weather every surface until it looks real. Plan your structure, blend authentic fired-clay tones, master the arch and chimney, and layer in soot and grime until the model tells its own story. Then stage it, expand it, and show it off.
The best part? You can start tonight. Sketch your kiln type, sort your reddish-brown and dark-orange bricks, and lay your first foundation this week. Which kiln will you build first — a compact beehive, a detailed Scotch, or the iconic bottle silhouette?
For sets, detail parts, and inspiration to fuel your next build, visit BrickHobby and start firing up your own kiln.
Frequently Asked Questions
How difficult is brick kiln model building for a beginner?
It's a great intermediate project and very approachable for motivated beginners. The straight walls and repeating arches of a Scotch kiln build cleanly on a grid, so there are no tricky curves to master early on. Start with curved-slope arch pieces for the openings, keep your scale consistent, and work bottom to top. The structure forgives small mistakes, which makes it a confidence-building step up from simple sets.
What colors and pieces make a kiln look authentic?
Blend four fired-clay tones — reddish brown as your main color, dark orange for baked sections, tan for worn patches, and dark red for older brickwork — and scatter them unevenly. Add texture with masonry bricks, grille tiles, and small slopes, then weather with dark-gray and black pieces near the fire openings. A few translucent orange and yellow parts create the ember glow that brings the whole model to life.
How do I build the arch without it collapsing?
Two reliable methods work. For a rounded arch, drop in curved slope pieces (arch bricks) to bridge the opening — the easiest route for beginners. For a pointed arch, use the SNOT technique: angle side-stud bricks inward so two slopes meet at the top. Frame the finished arch in a contrasting brick tone to reinforce the look and hide any small gaps. Build a solid base first so the arch has firm support.
How many pieces do I need for a brick kiln model?
Most satisfying kiln builds use between 500 and 1,200 pieces, depending on scale and how much of a working yard you add. A single minifigure-scale kiln on a 32x32 base sits at the lower end, while a full diorama with brick stacks, carts, and workers climbs higher. Focus on versatile masonry bricks, slopes, and detail tiles rather than raw piece count — texture matters far more than sheer volume.
Can I expand a single kiln into a larger scene?
Absolutely, and that's part of the appeal. Mount your kiln on a standard base so it can anchor a modular display. Add a working yard with drying racks, brick stacks, and minifigure workers, then link it to a clay pit or a finished-brick warehouse on adjoining bases. Because each section stands alone or connects to the next, you can grow the scene one evening at a time without ever rebuilding what you've already made.
Ready to build this yourself?
BrickHobby sells high-quality LEGO-alternative building block sets — the same brick standard, a fraction of the price. Browse our in-stock sets and simply contact our customer service team to place your order; we will confirm availability, pricing and worldwide shipping for you.
Keep reading

Brick News
Track Brick and LEGO Company News Like a Pro Builder
Learn how to track brick and lego company news, spot trends early, and choose better Lego alternatives like BrickHobby for your next build.

Brick News
How to Follow JT the Brick Lego News and Find Better Alternatives
Learn how to track JT the Brick Lego news, spot building trends, and choose the best Lego alternatives for your next build with this practical guide.
Brick News
How to Follow Lego Brick Manufacturer News and Find the Best Alternatives
Learn how to track lego brick manufacturer news and evaluate alternative brands like BrickHobby before your next build. A practical guide for collectors.