
How to Turn Yokohama Red Brick Warehouse Events Into Your Next Brick Build
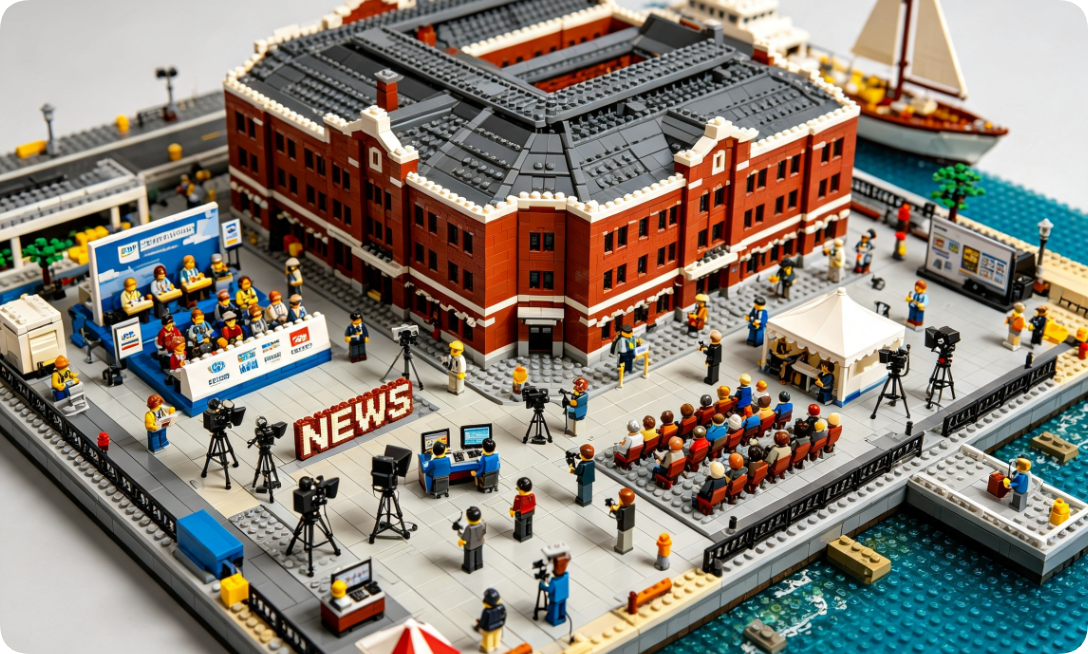
I hope this finds you with a clear table and a curious mind. Some of the best builds do not start with a set. They start with a place, a photo, or a moment that sticks with you. That is what we want to explore today.
The Yokohama Red Brick Warehouse is one of those places. It began as a pair of customs buildings on Japan's waterfront. Now it hosts seasonal markets, art shows, food festivals, and winter light displays. Each event dresses the same warehouses in a new mood. For a builder, that is a gift.
This guide shows you how to use event happenings at this landmark as fuel for original brick projects. Here is what you will walk away with:
- How to gather and read event details like a builder, not a tourist
- How to translate a real event into brick form
- How to plan a build that captures a season or a mood
- A simple workflow you can reuse for any place you love
Let's begin.
Why an Event Makes a Better Build Than a Building Alone
Most brick landmark projects stop at the structure. Walls, roof, windows, done. That is fine work, but it can feel a little cold.
An event adds a story. It gives your model a season, a crowd, a reason to exist. A quiet warehouse in summer light feels very different from the same warehouse ringed with a winter market and a tall lit tree. Same building. Different soul.
This is where following yokohama red brick warehouse event news becomes useful for your craft. You are not tracking dates to attend. You are collecting visual moods, color palettes, and small human details you can rebuild in plastic. Each festival hands you a fresh theme.
The Three Things an Event Gives You
When you look at an event through a builder's eye, you are hunting for three things.
- A color story: the dominant tones of that season's setup
- A focal feature: a stage, a tree, an ice rink, a market row
- Human details: stalls, lights, crowds, banners, small props
Get these three, and you have the skeleton of a build. The warehouse is just your backdrop. The event is the star.
Step 1: Gather Event Details Like a Builder
Your first job is research, but not the kind a visitor does. You are reading for shapes and colors, not opening hours.
Start a simple reference folder. A phone album or a desktop folder both work. As you follow yokohama red brick warehouse event news through travel blogs, photo galleries, and social posts, save anything that catches your eye. Do not overthink it yet. Collect first, sort later.
Look for a spread of angles. A wide shot shows you the whole layout. A close shot shows you a single stall or light fixture. You need both to build well.
What to Save for Each Event
Keep your saves focused. A tight folder beats a messy one every time.
- One or two wide establishing shots of the whole scene
- A few close-ups of the standout feature
- Color swatches you can pull from the photos
- Notes on the season and time of day
- Any repeating pattern, like a row of matching stalls
Ask yourself one question as you save: "Could I build this in bricks?" If the answer sparks an idea, keep it. If not, let it go.
Step 2: Choose One Event to Build
Here is a gentle trap to avoid. The landmark hosts many events, and it is tempting to cram several into one model. Resist that.
Pick a single event or season. A focused build reads clearly and tells one story well. A crowded build turns into visual noise, and noise hides your best work.
To choose, run each option through a quick test.
- Do I love the mood? Build what you enjoy looking at.
- Can I source enough reference? More photos mean easier building.
- Do I have the right parts? Match the palette to your collection.
- Is the scale realistic for me? Be honest about your time.
The winter light festival is a popular pick for good reason. It offers a strong focal feature, a rich color story, and plenty of glowing detail. But a spring flower market or a summer beer festival can be just as rewarding. Choose the one that makes you want to sit down and build.
Step 3: Translate the Event Into Brick Form
Now the real craft begins. You are turning a photograph into a plan. This step is where a place becomes a model.
Break the scene into three layers. Think of it like painting. You lay down the background, then the middle ground, then the foreground details.
The Background: Your Warehouse Shell
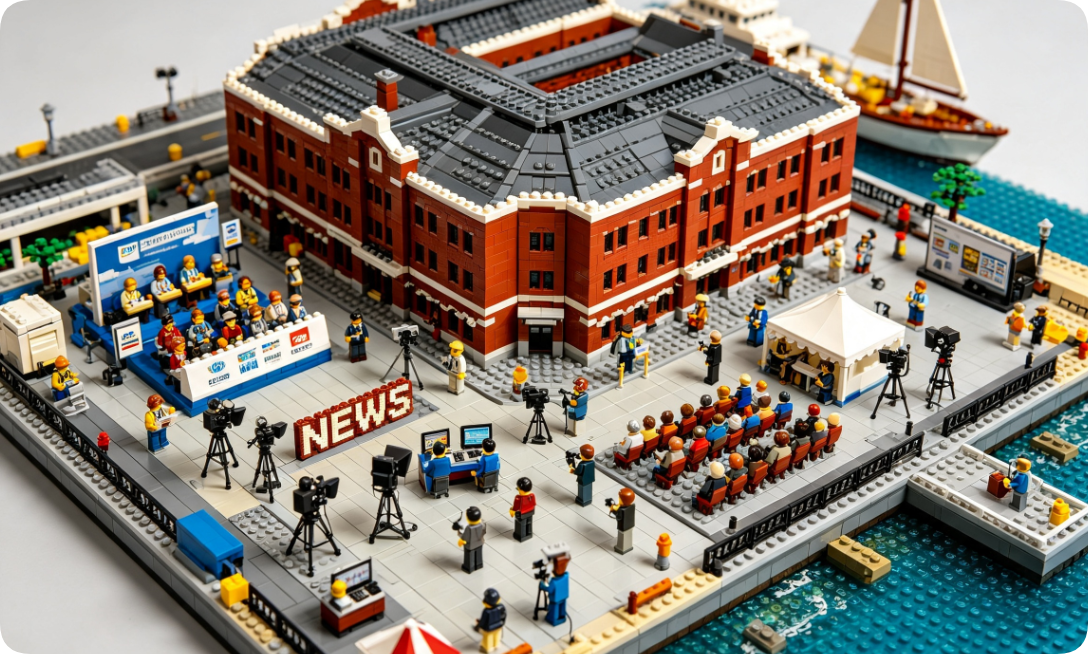
Start with the warehouse itself. The Red Brick Warehouse has a clean, repeating brick facade with tall arched windows. You do not need to recreate every course of brick. You need to capture the feeling: warm red-brown tones, rhythmic windows, and a solid, industrial shape.
Use a mix of reddish-brown and dark-orange pieces to avoid a flat wall. Real brick is never one color. Small tonal shifts across the facade read as age and texture. Keep your window arches even, since a crooked row is visible from across the room.
The Middle Ground: The Event Feature
This is your focal point, so give it the most attention. For a winter scene, that might be a lit tree or a market square. For summer, a stage or a row of food stalls.
Build this feature as its own module. Working in modules keeps your table tidy and lets you focus. Place it once it is finished and stable.
For lights, transparent and clear pieces do wonderful work. Cluster them where a real display would glow. If your set includes light-compatible parts, a small internal source makes the whole feature come alive after dark.
The Foreground: Human Details
Details are what turn a model into a scene. This is the layer most builders rush, and it shows.
Add the small things that say "an event is happening here."
- Market stalls with tiny goods on the counters
- Banners and signs along the walkway
- Small figures gathered near the focal feature
- Lamp posts, benches, and planters
- A food cart or two near the entrance
These parts are fiddly, but collectors love a model that rewards a close look. Take your time here. This is where your build earns its story.
Step 4: Plan the Palette Before You Build
Color makes or breaks a themed scene. A winter festival glows cool and warm at once, snow against golden lights. A spring market leans soft and bright. Plan this before you snap a single piece.
Pull three to five core colors from your reference photos. Lay those pieces out where you can see them. This keeps your build consistent and stops it from drifting into a random mix.
If you find your collection is short on a key color, this is the moment to note it. Planning ahead beats stopping mid-build to hunt for parts. When you need to fill a gap, our shop carries loose pieces and themed sets that mix well with what you already own.
A Quick Palette Checklist
- Choose one dominant color for the mood
- Add two supporting colors for balance
- Pick one accent color for the lights or focal feature
- Keep a few neutral tones for paths and structure
- Test the palette under the light you will display it in
A planned palette is the quiet secret behind builds that look finished rather than fussy.
Step 5: Build, Step Back, Repeat
With your plan set, building becomes a calm rhythm. Work from the back forward: warehouse shell first, then the feature, then the details.
Step back often. Walk around the model between stages. Fresh eyes catch small errors that tired eyes miss. A leaning stall or a gap in the crowd is easy to fix early and annoying to fix late.
If a piece feels loose, rebuild that small section rather than forcing it. A stable model travels and displays far better over time. When the scene reads as one moment frozen in place, you are done.
A Reusable Workflow for Any Place You Love
The real gift of this method is that it works anywhere. Once you have done it once, you can repeat it for any landmark or festival.
- Collect reference photos with a builder's eye.
- Choose one event or mood to focus on.
- Split the scene into background, feature, and foreground.
- Plan a tight palette before building.
- Build in modules and step back often.
Keep this list somewhere handy. It turns "I saw a cool place once" into a finished model on your shelf.
Common Mistakes to Avoid
Even careful builders slip into a few traps with event-based scenes. Here are the ones we see most.
- Building the warehouse and forgetting the event. The building is your backdrop, not your subject. Give the event top billing.
- Cramming in multiple festivals. One clear story beats a crowded mess. Pick a single moment.
- Skipping the palette plan. Random colors make a scene look unfinished. Choose your tones first.
- Rushing the foreground. The small details are where the story lives. Slow down for them.
- Ignoring the light. A glowing festival scene needs the right lighting to shine. Plan for it.
Sidestep these five, and your build will feel far more alive.
Why This Approach Suits BrickHobby Builders
We know you have many choices, and we are grateful you are building with us. We would like to be honest about who we are.
We are a small team making sets as a LEGO alternative. Our bricks follow standard clamp dimensions, so they connect firmly and mix well with the pieces you already own. That compatibility matters when you build an original scene like this one. You are not limited to a single kit. You can pull from everything on your table.
Our pricing sits below the big names for a comparable piece count, which helps when a themed scene calls for lots of one color. Every set comes with a missing-piece guarantee. If something is short in your box, we send the part at no cost, and we check every report ourselves.
Our sets still have room to improve, and your feedback shapes what we make next. If you would like to know more about who we are and why we started, visit our about page. To browse the full brand and our current lineup, stop by BrickHobby. We would be glad to have you.
Conclusion
A landmark gives you a shape. An event gives you a story. When you learn to read yokohama red brick warehouse event news through a builder's eye, you turn a distant place into a scene you can hold in your hands. You gather reference, choose one mood, split the scene into layers, plan your palette, and build with patience.
The lesson is simple. Do not just build the walls. Build the moment. A quiet warehouse becomes a winter festival, a spring market, or a summer night, all through the details you choose to add.
Ready for your next step? This week, pick one event that moves you and start a reference folder. Save five photos, pull three colors, and sketch a rough plan. Then clear your table and build the first module.
Thank you for building with us. I hope your next scene brings you calm and a little wonder, and I wish you many happy hours at the table\~
Frequently Asked Questions
Do I need to visit Yokohama to build one of these scenes?\
Not at all. You build entirely from photos and event coverage. Following yokohama red brick warehouse event news online gives you all the visual reference you need, from wide layout shots to close-ups of stalls and lights. Many builders never see their subject in person.
Which event is easiest to start with?\
The winter light festival is a friendly first choice. It has a strong focal feature, a clear color story, and lots of glowing detail that hides small mistakes. That said, pick the season you love most. Enjoyment keeps you at the table longer.
How do I capture the warehouse brick look without hundreds of pieces?\
Focus on the feeling, not perfect accuracy. Blend two or three reddish-brown tones for the facade and keep your window arches even. That tonal mix reads as real brick from a normal viewing distance, so you do not need an exact course-by-course copy.
What if I run out of a key color partway through?\
This is why we plan the palette first. If you spot a gap early, you can order loose pieces before you build rather than stalling mid-project. Matching your palette to your collection at the planning stage saves a lot of frustration.
Can beginners try an event-based build?\
Yes. Start small with a single stall or a simple lit tree beside a plain warehouse wall. As your confidence grows, add more of the foreground detail. The layered method scales down easily, so you can begin gently and build up over time.
Ready to build this yourself?
BrickHobby sells high-quality LEGO-alternative building block sets — the same brick standard, a fraction of the price. Browse our in-stock sets and simply contact our customer service team to place your order; we will confirm availability, pricing and worldwide shipping for you.
Keep reading
Brick News
Brick NJ Local LEGO News: A Builder's Guide to Finding Better Alternative Bricks
Track brick nj local lego news to time your purchases and evaluate LEGO alternative brands like BrickHobby. A complete how-to guide for US and EU builders.
Brick News
The Brick LEGO News 2026: Your Complete Guide to Smarter Alternative Builds
Stay ahead of the brick LEGO news 2026 with this guide to trending sets, alternative bricks, and smarter building strategies from BrickHobby.
Brick News
How to Track Brick Supply News LEGO Builders Actually Trust
Learn how to find and evaluate brick supply news for LEGO alternative sets, from reliable sources to step-by-step supplier sourcing tips.