architecture-landmarks
How to Plan and Build Impressive Architecture Models with Building Blocks
How to Plan and Build Impressive Architecture Models with Building Blocks
Real buildings follow rules. Proportion, symmetry, load paths, sightlines. When you recreate a structure in brick form, those same rules decide whether your model looks like a landmark or a lumpy box.
This guide walks you through the process — from choosing a subject to planning scale, engineering a stable structure, and displaying the finished piece. Architecture building blocks give you the parts. This guide gives you the method.
For adult builders chasing museum-quality results, the difference is planning. Let's get into it.
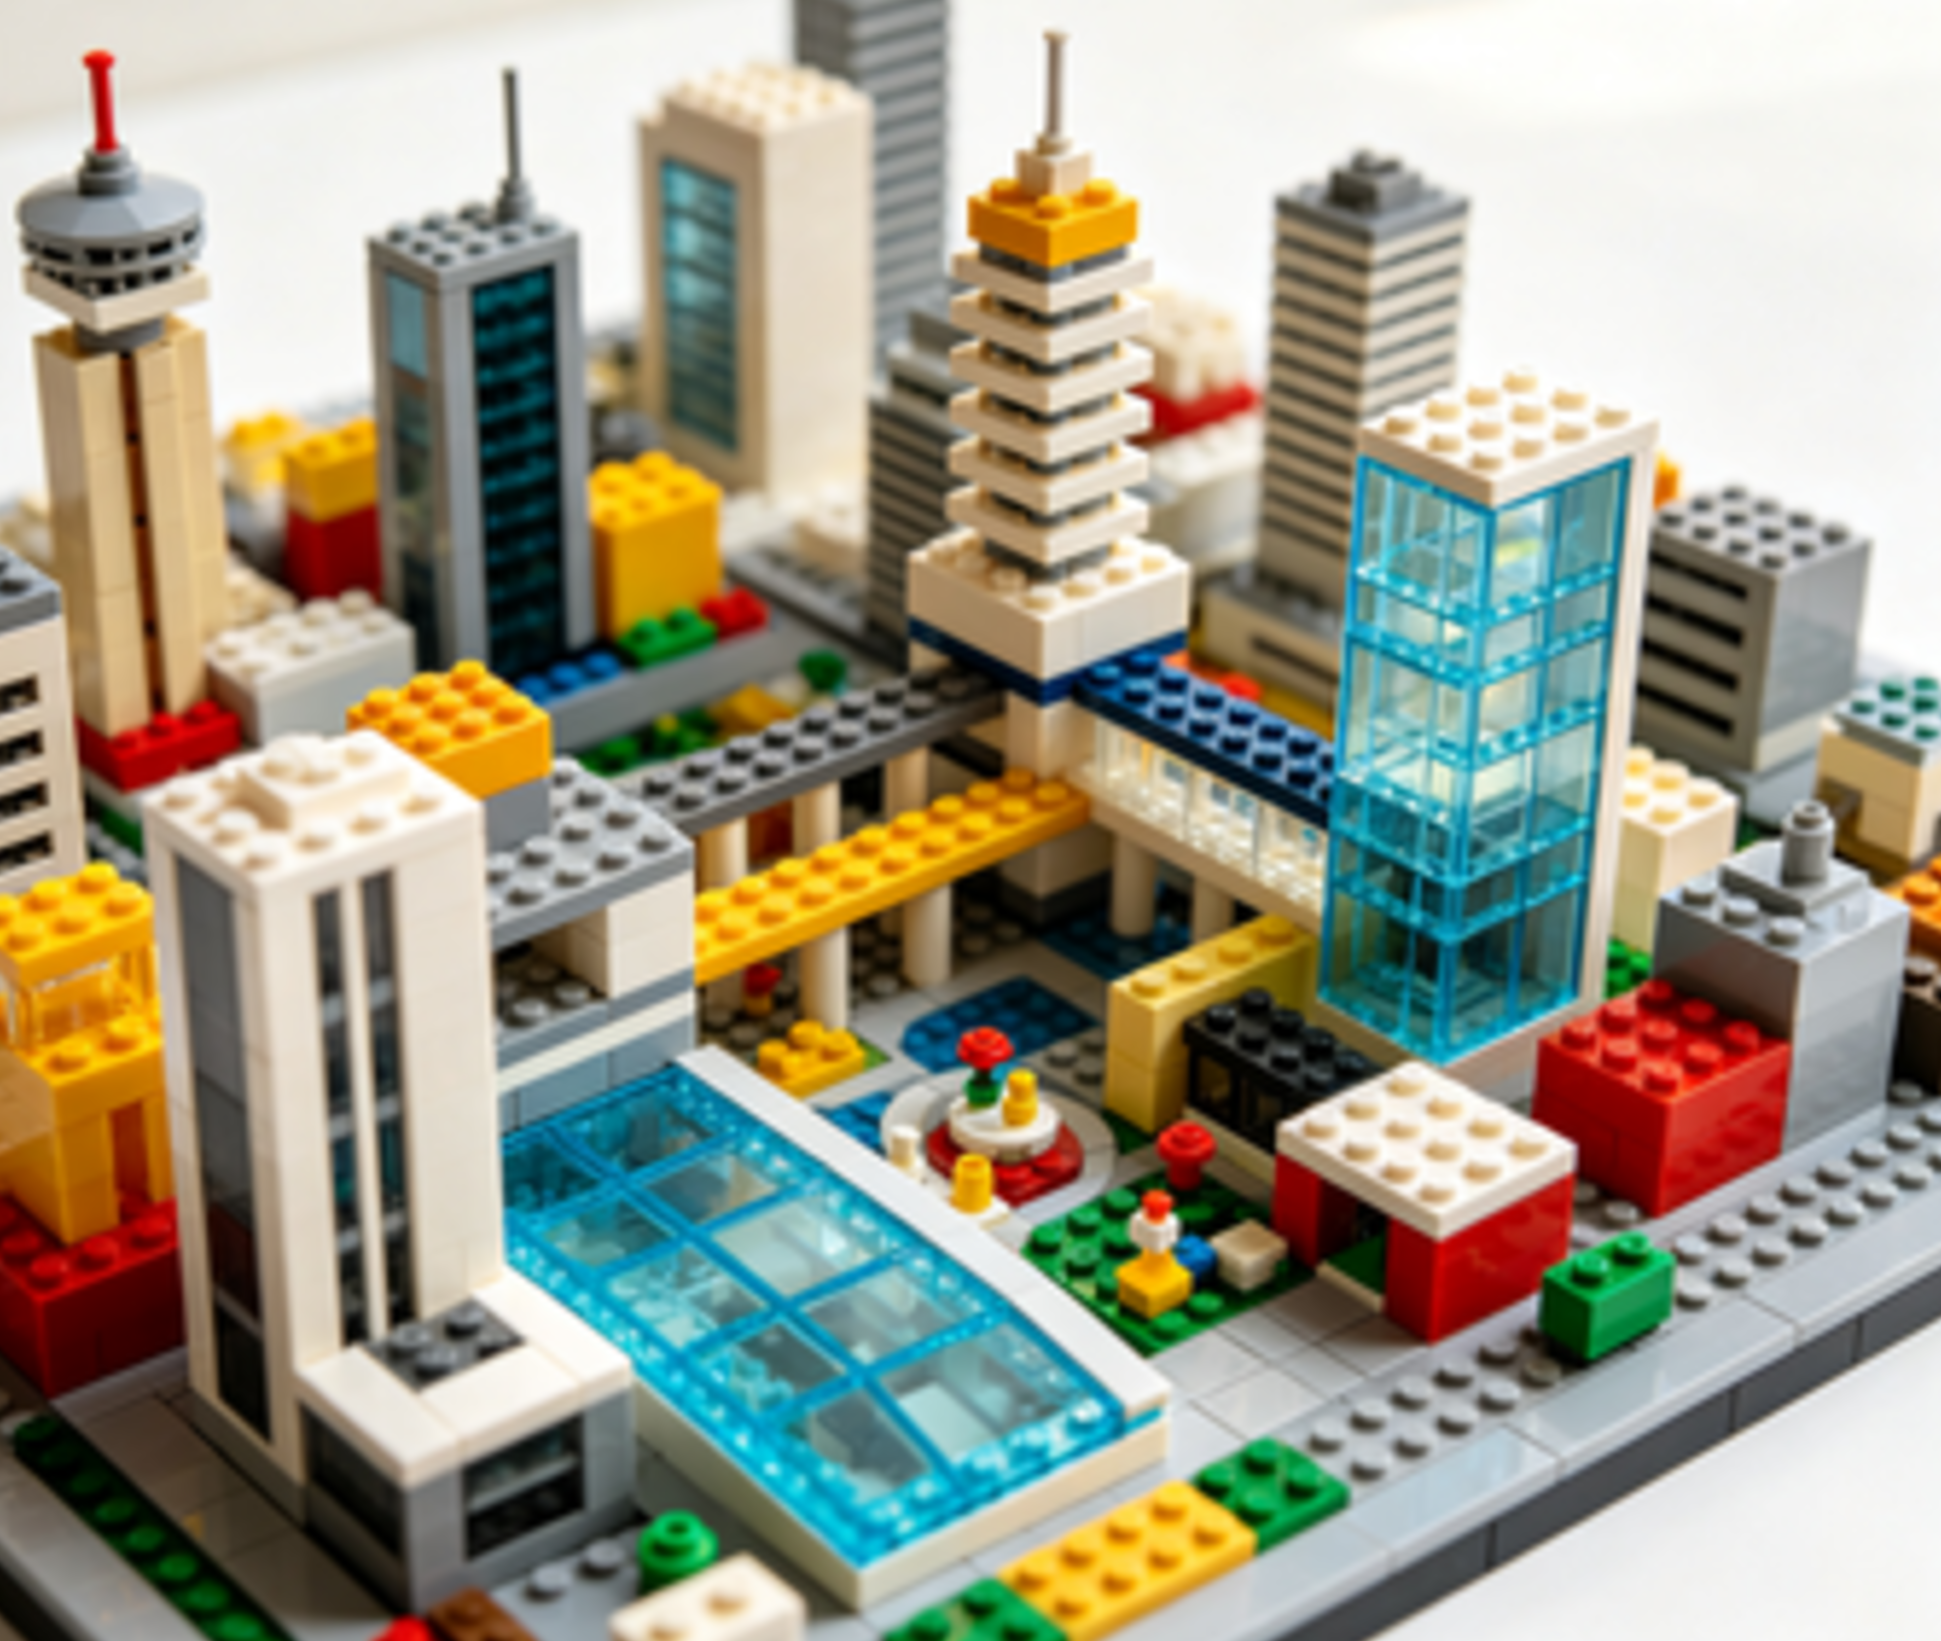
Start With the Right Subject
Not every building translates well into brick. Pick the wrong subject and you fight the medium the whole way. Pick the right one and the bricks do half the work for you.
Good first subjects share three traits:
- Strong geometry. Rectangular towers, domes, and repeating window grids convert cleanly into studs and plates.
- Recognizable silhouette. A shape people know at a glance — the Flatiron Building, a Gothic cathedral, a modern glass tower.
- Manageable detail. Enough character to be interesting, not so much that you drown in tiny parts.
Skip buildings with heavy organic curves for your first serious attempt. Sweeping, non-repeating forms demand advanced techniques and huge part counts.
Instead, look at:
- Classic skyscrapers — clean vertical lines, tiered setbacks.
- Row houses and townhomes — modular, repeatable, satisfying.
- Historic civic buildings — columns, pediments, symmetry.
- Modernist landmarks — bold shapes, minimal clutter.
BrickHobby stocks themed architecture building blocks sets built around these subjects, which cut your planning time. Browse the range at BrickHobby to see what fits your project.
Choose Your Scale Before You Buy a Single Brick
Scale is the first real decision. It controls part count, cost, detail level, and shelf footprint. Lock it in early.
The Three Common Scales
Microscale. One stud represents a large chunk of the real building. Whole skyscrapers stand a few inches tall. Best for city skylines and collections where many buildings share one shelf.
Minifig scale. Sized so a standard figure fits through the doors. Best when you want interiors, people, and street-level life. Part counts climb fast at this scale.
Display scale. Bigger than microscale, no figures. This is the sweet spot for most architectural showpieces. Enough size for real detail, without the runaway cost of full minifig scale.
For a standalone landmark you'll display, pick display scale. It rewards detail work without demanding tens of thousands of parts.
Lock the Ratio
Once you pick a scale, set a fixed ratio and stick to it. Decide how many real-world feet one brick layer represents. Write it down. Every measurement on your model flows from that single number.
Break the ratio partway through and your proportions collapse. Consistency is what makes a model read as accurate.
Study the Real Building Like an Architect
Before you build, research. The best models come from careful observation, not memory.
Gather Reference Images
Collect photos from every angle:
- Front, back, and both sides
- A straight-on elevation of each face
- Corner shots that show how faces meet
- Close-ups of repeating details — windows, cornices, doorways
A straight-on elevation matters most. Angled tourist photos distort proportion. A flat elevation lets you count floors, measure window spacing, and map the facade accurately.
Count the Repeats
Real buildings repeat. Count the floors. Count the windows per floor. Count the columns. These numbers become your building plan.
If a tower has 14 identical floors, you build one floor module and repeat it 14 times. This is the single biggest time-saver in architectural building — and the reason strong geometry makes a better subject.
Note the Proportions
Measure the ratios, not just the sizes. How tall is the base compared to the tower? How wide is a window versus the wall between windows? Getting these ratios right matters more than matching exact dimensions. Your eye reads proportion instantly.
Plan the Structure From the Inside Out
A tall model is a structural problem. Height plus weight equals stress. Plan the skeleton before the skin.
Build a Strong Core
Tall builds need an internal frame. Don't rely on outer walls alone to carry the load. Construct an interior column or box structure that runs the full height. The decorative facade attaches to this core.
Think of it the way real engineers do — a strong internal skeleton, a lighter outer shell. This separation keeps your model stable and lets you adjust the facade without tearing down the structure.
Overlap Every Layer
The most important structural habit: stagger your seams. Never stack bricks so their joints line up vertically. Offset each layer like real bricklaying. Overlapping joints turn loose stacks into solid walls.
For long straight walls, this is non-negotiable. Aligned seams create a weak line that cracks apart the moment you lift the model.
Reinforce the Base
Weight travels down. Your base carries everything above it. Build it thick and solid. Use plates layered across brick seams to tie the whole foundation together. A tower with a weak base leans, then falls.
Plan for Handling
You'll move this model. For photos, for dusting, for shows. Build it so you can lift it without stress cracks. On large pieces, design the model in liftable sections that lock together but separate cleanly for transport.
BrickHobby's structural bricks and baseplates are made from ABS plastic for firm clutch and long-term hold — see the parts range at BrickHobby.

Recreate Real-World Architectural Details
Details separate a good model from a great one. Here's how to capture the features that define real architecture.
Windows and Facades
Windows set the rhythm of a building. Use consistent spacing based on your reference count. Options for the glass:
- Transparent bricks or panels for a literal glass look.
- Dark tiles for a shadowed, recessed window.
- Open studs left empty to suggest depth.
Pick one method and apply it across the whole facade. Consistency reads as intentional design.
Columns and Vertical Lines
Classical buildings lean on columns. Recreate them with round bricks, bars, or stacked cylinder pieces. Modernist towers rely on strong vertical lines — use tiles and plates turned on edge to create clean, unbroken verticals.
Cornices, Ledges, and Setbacks
The top of a building carries its personality. Cornices, ledges, and stepped setbacks catch light and cast shadow. Build these with plates and tiles that overhang slightly. Small overhangs add the depth that flat facades lack.
Roofs and Domes
Roofs test your skills. For sloped roofs, use angled slope pieces in overlapping rows. For domes, work in rings — each ring slightly smaller than the one below, using small angled pieces to curve inward. Domes take patience. Build them as a separate module and attach when finished.
Texture and Weathering
Real buildings aren't one flat color. Mix in slightly different shades of gray, tan, or brown to suggest stone blocks and age. Vary your surface with a mix of smooth tiles and studded bricks. Flat, uniform surfaces look toy-like. Texture reads as real.
Advanced Techniques Worth Learning
Once you've built a few models, these techniques push your work to the next level.
SNOT building. Studs Not On Top. Turn bricks sideways to place detail on vertical faces. Essential for signage, fine facade work, and clean flat surfaces.
Half-plate offsets. Using plates and jumpers to shift elements by half a stud. This unlocks proportions the standard grid won't allow — critical for matching real window spacing.
Bracket work. Brackets let you hang detail off the sides of your structure. Perfect for cornices, ledges, and layered facades.
Mosaic facades. For brick-pattern or stone-pattern walls, build the facade as a flat mosaic of small plates, then stand it up against your core.
These take practice. Start with one, master it, then add the next. The builder community shares detailed tutorials on each — a search through forums and video guides will show you dozens of worked examples.
Display Your Finished Model
A great model deserves a great display. This final step is where many builders stop short.
Pick the Right Spot
Choose a location away from direct sunlight. UV light fades brick color over months. A shelf, a cabinet, or a dedicated display case all work — just keep it out of a sunny window.
Light It Well
Lighting transforms an architectural model. Options:
- External spotlights angled to rake across the facade and reveal texture.
- Internal LED strings to light windows from within — stunning on skyscrapers at night.
- A backlit base to lift the whole piece off the shelf.
Warm light suits historic stone buildings. Cool white suits modern glass towers. Match the light to the architecture.
Build a Base and Label
A finished base frames the model. Add a strip of "street," a sidewalk edge, or a small plaza. Then add a printed name plate with the building's name and your build date. It turns a model into a proper display piece.
Control the Dust
Dust is the enemy of any long-term display. A glass case is the best defense. If you display in the open, a soft brush or a can of compressed air keeps the facade clean. Plan for this — you'll thank yourself in a year.
Share Your Work and Keep Improving
The building community is your best resource. Post your finished model on forums and social groups. Photograph it well — good light, clean background, multiple angles.
Feedback sharpens your next build. Other builders spot proportion issues you missed and suggest techniques you haven't tried. Many will share their own reference photos and part solutions.
Set a challenge for yourself. Recreate your hometown's most famous building. Build a scaled version of a house you've lived in. Tackle a landmark you've always wanted to visit. Personal projects keep the hobby fresh.
For your next project, BrickHobby offers architecture building blocks sets and loose parts sorted for detailed builds. No Customs or Duty Fees on orders — the price at checkout is the final amount you pay. See the full selection at BrickHobby.
Wrapping Up
Building architecture in brick is equal parts art and engineering. Pick a subject with strong geometry. Lock your scale and ratio early. Research the real building like an architect. Engineer a solid core, overlap every layer, and reinforce the base. Capture the details that define the structure. Then light it, base it, and display it with pride.
Follow this process and your models stop looking like toys and start looking like the buildings that inspired them.
Now pick your subject, set your scale, and start planning. Your landmark is waiting.
Frequently Asked Questions
How many bricks do I need to build an architectural model?
It depends entirely on scale. A microscale skyscraper might take 200 to 500 pieces. A display-scale landmark with full detail often runs 2,000 to 5,000. A large minifig-scale building with interiors can climb past 10,000. Decide your scale first, then estimate — count your floor modules and multiply. Start smaller for your first serious build, then scale up as your skills grow.
What scale is best for displaying architecture building blocks models?
Display scale is the sweet spot for most hobbyists. It's larger than microscale, so you get room for real detail like windows, cornices, and texture, but it avoids the huge part count and cost of full minifig scale. Microscale is better if you want to display a whole skyline on one shelf. Match the scale to the space you have and the detail you want.
How do I keep a tall model from falling apart?
Three habits solve most stability problems. First, build a strong internal core that carries the load, rather than relying on outer walls. Second, stagger your brick seams so joints never line up vertically — overlapping layers create solid walls. Third, reinforce the base with layered plates that tie the foundation together. Do these three things and even tall towers stay rock-solid.
Can beginners build detailed architecture models?
Yes. Start with a subject that has strong, repeating geometry — a simple tower or row house — and build at display scale. The core techniques (overlapping seams, a strong base, consistent window spacing) are easy to learn. Advanced methods like SNOT and bracket work can wait until you've finished a few projects. Detailed guides and community support make the learning curve manageable at any level.
How do I recreate a specific real-world building accurately?
Research is everything. Gather straight-on elevation photos of each face, since angled shots distort proportion. Count the repeating elements — floors, windows, columns — and use those numbers as your building plan. Focus on getting proportions and ratios right rather than exact dimensions, because your eye reads proportion instantly. Build one repeating module, perfect it, then copy it across the facade.